# 1. 概述
我们先看一张 Binder 的结构图:
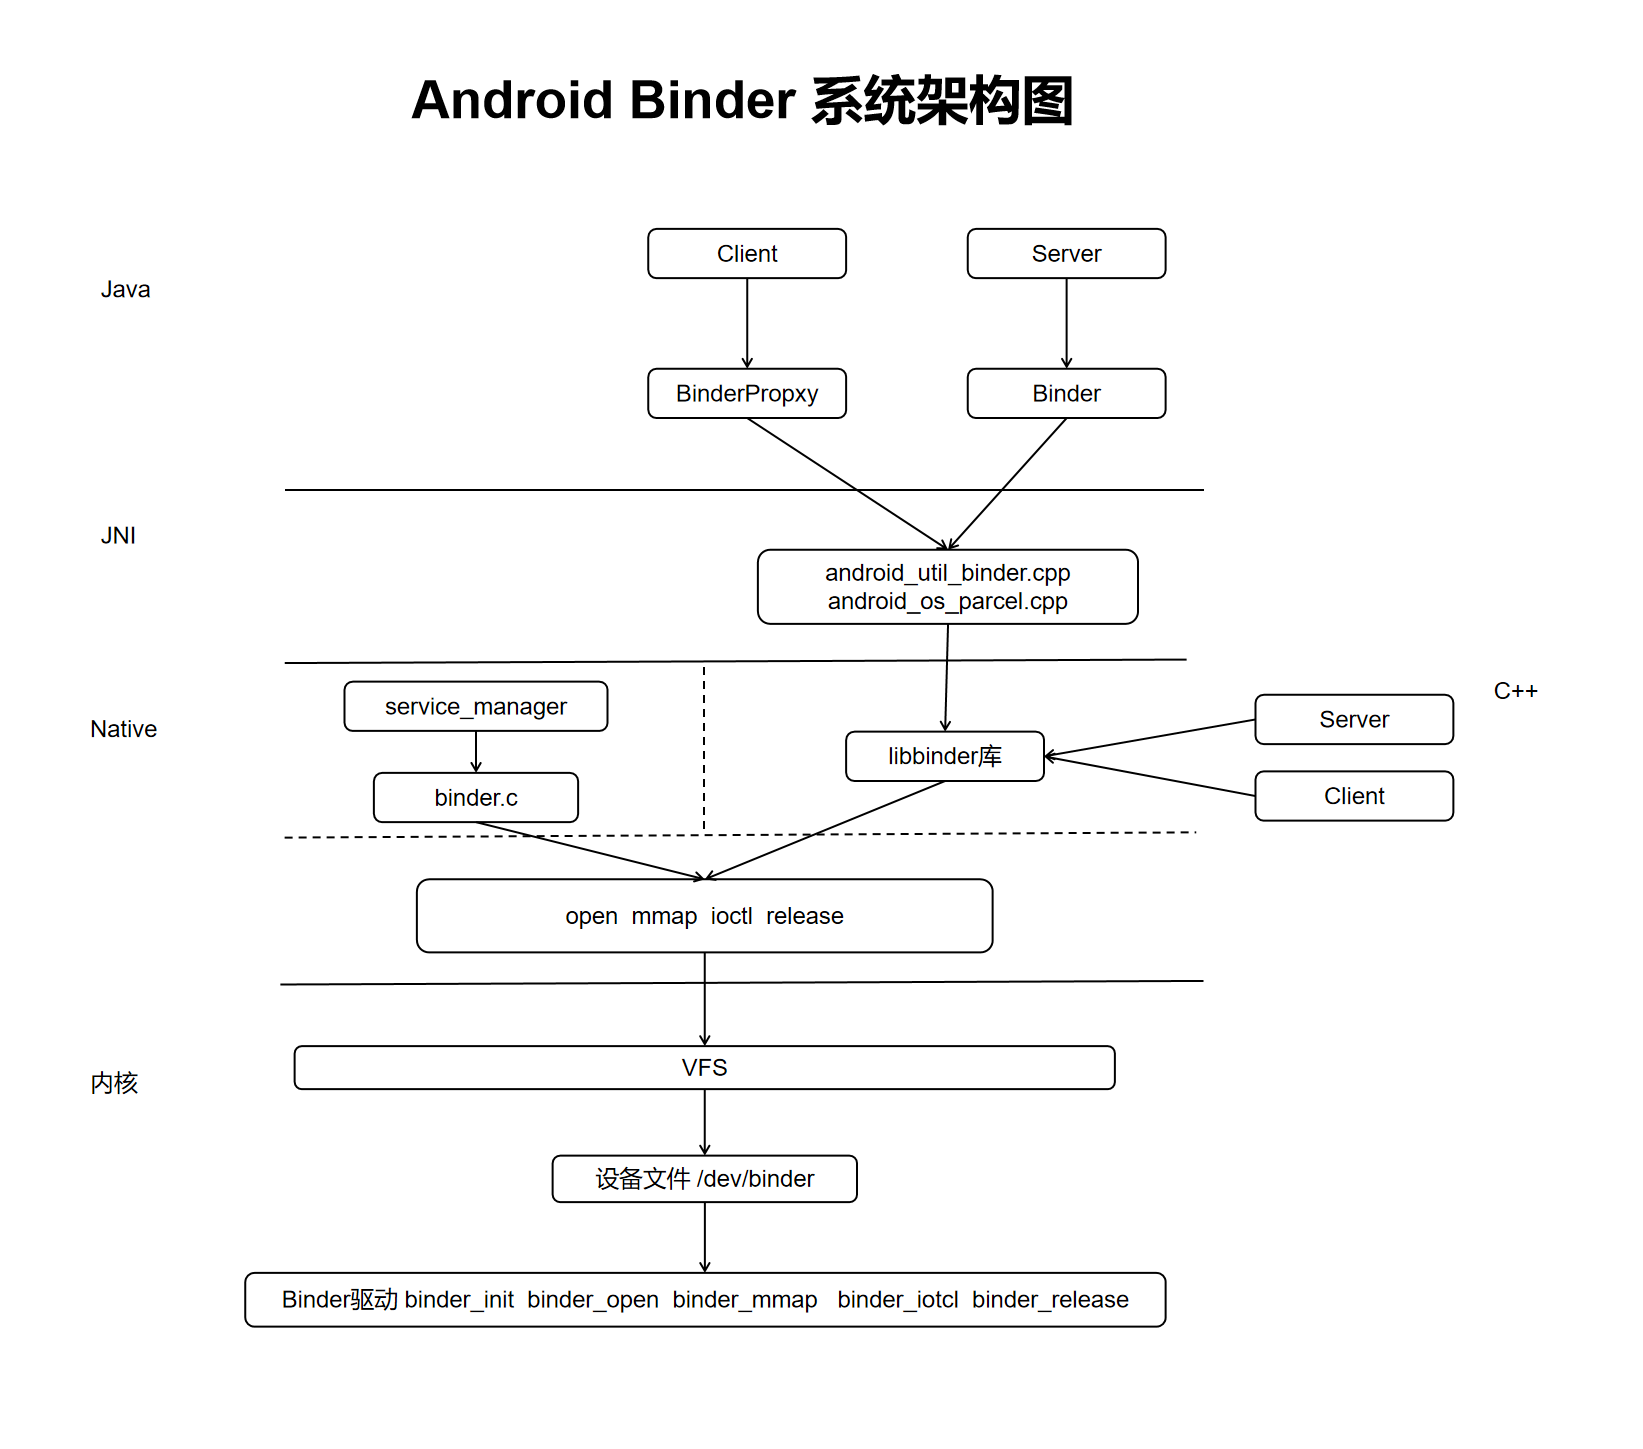
从图中可以看出,Binder 系统涉及的知识面横跨了内核、Native、JNI、Java 四层,要完整地掌握整个 Binder 系统,需要的基础知识包括了:
C/C++ Java 编程语言
- C 语言推荐三本书 《一站式学习C编程》、《C语言非常道》、《嵌入式C语言自我修养》,建议任意一本快速过一遍语法,剩下的在实践中慢慢学习。
- C++ 推荐《21天学通 C++》第八版,老外写的,清晰易懂,和 C 语言一样,快速过一遍语法,剩下的在实践中慢慢学习
- Java 推荐看看《Java 核心技术》
JNI:JNI 没有特别适合的书,可以参考我写的专栏博客 《JNI 编程入门指南》
Linux 系统编程,对于 Binder 学习,只需要了解文件访问相关的接口,需要深入学习的同学推荐一门课,三本书:
Linux编程技术 (opens new window),这是西安邮电大学提供的一套 mooc 课程,可供入门学习使用
《Linux 系统编程 杰克-本尼 佩尔松》
《UNIX 环境高级编程》《Linux/Unix 系统编程手册》:这两本书可以作为编程过程中的字典使用
Linux 内核入门,对于 Binder 学习,只需要了解驱动的基本开发流程以及内核中常用的一些数据结构,如果需要深入学习,推荐以下的一些资料:
操作系统及Linux内核 (opens new window), 这是西安邮电大学提供的一套 mooc 课程,可供入门学习使用
《深入理解 Linux 内核 第三版》
《奔跑吧Linux 内核 系列书籍》
Linux 驱动开发:推荐韦东山老师 B 站分享的系列课程
以上的内容过于繁多了,等我们学完黄花菜都凉了。我抽取提炼了一些学习 Binder 必须要掌握的知识,供初学者快速入门,这些内容主要包含了:
- AOSP 上手指南
- Linux 内核下载编译运行
- Linux 驱动开发入门
- Linux 内核常用数据结构
- 虚拟内存
- Linux 文件访问接口
- JNI 编程入门,在基础篇做讲解
其他深入的内容,可以在实践中边做边学。
# 2. AOSP 上手指南
这部分内容请阅读 AOSP 极速上手 (opens new window)
# 3. Linux 内核下载编译运行
# 3.1 内核下载
下载适用于模拟器的内核:
git clone https://aosp.tuna.tsinghua.edu.cn/android/kernel/goldfish.git
#查看分支
git branch -a
git checkout android-goldfish-4.14-gchips
2
3
4
编写编译脚本:
#!/bin/bash
export ARCH=x86_64
export SUBARCH=x86_64
export CROSS_COMPILE=x86_64-linux-android-
export PATH=android源码目录/prebuilts/gcc/linux-x86/x86/x86_64-linux-android-4.9/bin:$PATH
make x86_64_ranchu_defconfig
make -j16
2
3
4
5
6
7
将以上的内容保存为 build.sh 脚本文件。执行 sh build.sh 开始编译。
编译报错,修改代码:
- 删除 scripts/selinux/mdp/mdp.c 文件中的 #include <sys/socket.h>
- 删除 scripts/selinux/genheaders/genheaders.c 文件中的 #include <sys/socket.h>
- 在 security/selinux/include/classmap.h 头部添加 #include <linux/socket.h>
执行编译脚本 sh build.sh 即可编译成功
# 3.2 自定义内核启动
启动之前,需要把之前启动的模拟器和启动模拟器的终端都关掉。
source build/envsetup.sh

lunch aosp_x86_64-eng

emulator -kernel 内核地址/goldfish/arch/x86_64/boot/bzImage
2
3
4
5
6
启动成功,打开模拟器设置页面,进入版本信息。
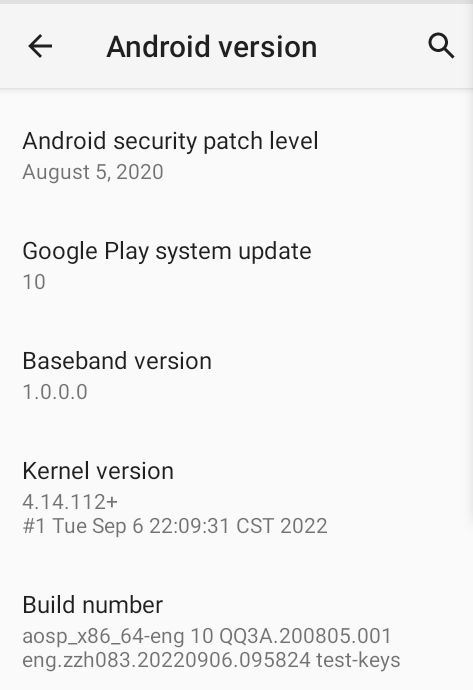
可以看到 Kernel version 项里,已经是最新编译的内核版本了。
# 4. Linux 驱动开发入门
# 4.1 编写一个简单的 Linux 内核模块
首先,我们需要理解什么是内核模块?简单来说,内核模块是一段 "固定格式" 的代码,像一个“插件”一样,linux 内核可以动态的加载并执行这段代码,也可以把这段代码编译进内核,在内核启动的时候来执行这段代码。
下面我们写一个简单的 linux 模块:
在内核的 /drivers/char 目录中添加 hello_module.c
#include <linux/module.h>
#include <linux/init.h>

/**
 * __init 是一个宏,表示 hello_init 是一个初始化函数,会放到编译后目标文件的初始化段中
 */
static int __init hello_init(void)
{
	//printk 是内核中的日志打印函数
	printk("Hello world!\n");
	return 0;
}

/**
 * __exit 是一个宏,表示 hello_exit 是一个初始化函数,会放到编译后目标文件的初始化段中
 */
static void __exit hello_exit(void)
{
	printk("hello exit\n");
}

/**
 * hello_init 是当前模块的启动函数
 */
module_init(hello_init);
/*
 * hello_exit 是当前模块的退出函数
 */
module_exit(hello_exit);
2
3
4
5
6
7
8
9
10
11
12
13
14
15
16
17
18
19
20
21
22
23
24
25
26
27
28
29
# 4.2 将模块编译进内核
接下来我们修改 /drivers/char/Kconfig 文件,使得我们的 hello 模块,能出现在内核的编译选项中。
在 /drivers/char 中的 Kconfig 文件中添加:
config HELLO_MODULE
	bool "hello module support"
	default y
2
3
然后在 /drivers/char 下的 Makefile 文件中添加:
obj-$(CONFIG_HELLO_MODULE) += hello_module.o
当在 make menuconfig 编译菜单中选中了 hello module support, CONFIG_HELLO_MODULE 的值是 y,没有选中值是 m(我们定义的默认值是 y):
- obj-y += hello_module.o 的意思是将 hello_module.o 编译进内核
- obj-m += hello_module.o 的意思是文件 hello_module.o 作为"模块"进行编译,不会编译到内核,但是会生成一个独立的 "hello_module.ko" 文件,可以使用 insmod 命令将模块加载到内核中
最后配置内核:
cp ./arch/x86/configs/x86_64_ranchu_defconfig .config
make menuconfig
2
进入 Device Drivers 选项:
.png)
进入 Character devices
.png)
这里就可以看见我们刚才添加的选项,默认是选上的。
.png)
然后执行编译:
# clean 一下,防止出错
make clean
#执行之前的编译脚本
sh build.sh
2
3
4
进入 AOSP 源码启动模拟器:
source build/envsetup.sh
lunch aosp_x86_64-eng
emulator -kernel ~/kernel/goldfish/arch/x86_64/boot/bzImage
2
3
查看开机信息:
# dmesg 用于显示开机信息
adb shell dmesg
2
.png)
# 4.3 linux 中文件的读写
驱动是干什么的?在驱动的相关书籍上,网络上你能看到很多专业的定义。我们暂时不关心这些专业的说法,仅从功能的角度来说,驱动程序使得应用程序可以访问硬件。
那应用是如何访问硬件的?linux 中一切皆文件,访问硬件就是对文件的读写操作。比如 led 灯对应的文件是 /dev/led, 读写这个文件就能操作 led 灯。
接下来的问题就是,linux 中如何读写文件?
linux中文件读写相关的主要 api:
//打开文件
int open(const char *pathname, int flags, mode_t mode);
//从文件中读数据
ssize_t read(int fd, void *buf, size_t count);
//向文件中写数据
ssize_t write(int fd, const void *buf, size_t count);
//专用于设备输入输出操作
int ioctl(int fd, unsigned long request, ...);
//关闭文件的读写,回收资源
int close(int fd);
2
3
4
5
6
7
8
9
10
函数的具体用法不是本文的重点,有兴趣的同学可以学习 Linux程序设计 (opens new window) 的第二章。工作中忘了,可以通过 man 命名查看具体用法。
下面来看一下 open 函数:
//该函数用于打开文件
int open(const char *pathname, int flags, mode_t mode);
2
当打开一个文件的时候,会返回一个 int 值,一般称这个返回值为句柄或者 handle,在内核中,句柄是一个数组的索引(index),数组的成员是 struct file :
struct file {
        union {
                struct llist_node       fu_llist;
                struct rcu_head         fu_rcuhead;
        } f_u;
        struct path             f_path;
        struct inode            *f_inode;       /* cached value */
        const struct file_operations    *f_op;   //关注1

        /*
         * Protects f_ep_links, f_flags.
         * Must not be taken from IRQ context.
         */
        spinlock_t              f_lock;
        enum rw_hint            f_write_hint;
        atomic_long_t           f_count;
        unsigned int            f_flags;  //关注2
        fmode_t                 f_mode;	  //关注3
        struct mutex            f_pos_lock;
        loff_t                  f_pos;	  //关注4
        struct fown_struct      f_owner;
        const struct cred       *f_cred;
        struct file_ra_state    f_ra;

        u64                     f_version;
#ifdef CONFIG_SECURITY
        void                    *f_security;
#endif
        /* needed for tty driver, and maybe others */
        void                    *private_data;

#ifdef CONFIG_EPOLL
        /* Used by fs/eventpoll.c to link all the hooks to this file */
        struct list_head        f_ep_links;
        struct list_head        f_tfile_llink;
#endif /* #ifdef CONFIG_EPOLL */
        struct address_space    *f_mapping;
        errseq_t                f_wb_err;
} __randomize_layout
  __attribute__((aligned(4)));
2
3
4
5
6
7
8
9
10
11
12
13
14
15
16
17
18
19
20
21
22
23
24
25
26
27
28
29
30
31
32
33
34
35
36
37
38
39
40
struct file 的结构有点复杂,入门阶段主要关注代码中标注的四个关注点。
在内核中,有一个 struct file 的数组,当调用 open 函数打开一个文件的时候,内核就会构建一个 struct file,并添加到这个数组中,返回 struct file 在数组中的 index 给用户态程序,这个值就是 open 函数的返回值。
根据文件的命名,容易猜出:使用 open 打开文件时,传入的 flags、mode 等参数会被记录在内核中,具体如下图所示:
.png)
struct file 有一个成员为 file_operations:
struct file_operations {
	struct module *owner;
	loff_t (*llseek) (struct file *, loff_t, int);
	ssize_t (*read) (struct file *, char __user *, size_t, loff_t *);  //关注点1
	ssize_t (*write) (struct file *, const char __user *, size_t, loff_t *); //关注点2
	ssize_t (*read_iter) (struct kiocb *, struct iov_iter *);
	ssize_t (*write_iter) (struct kiocb *, struct iov_iter *);
	int (*iterate) (struct file *, struct dir_context *);
	int (*iterate_shared) (struct file *, struct dir_context *);
	unsigned int (*poll) (struct file *, struct poll_table_struct *);
	long (*unlocked_ioctl) (struct file *, unsigned int, unsigned long);
	long (*compat_ioctl) (struct file *, unsigned int, unsigned long);//关注点3
	int (*mmap) (struct file *, struct vm_area_struct *);//关注点4
	int (*open) (struct inode *, struct file *);//关注点5
	int (*flush) (struct file *, fl_owner_t id);//关注点6
	int (*release) (struct inode *, struct file *);//关注点7
	int (*fsync) (struct file *, loff_t, loff_t, int datasync);
	int (*fasync) (int, struct file *, int);
	int (*lock) (struct file *, int, struct file_lock *);
	ssize_t (*sendpage) (struct file *, struct page *, int, size_t, loff_t *, int);
	unsigned long (*get_unmapped_area)(struct file *, unsigned long, unsigned long, unsigned long, unsigned long);
	int (*check_flags)(int);
	int (*flock) (struct file *, int, struct file_lock *);
	ssize_t (*splice_write)(struct pipe_inode_info *, struct file *, loff_t *, size_t, unsigned int);
	ssize_t (*splice_read)(struct file *, loff_t *, struct pipe_inode_info *, size_t, unsigned int);
	int (*setlease)(struct file *, long, struct file_lock **, void **);
	long (*fallocate)(struct file *file, int mode, loff_t offset,
			  loff_t len);
	void (*show_fdinfo)(struct seq_file *m, struct file *f);
#ifndef CONFIG_MMU
	unsigned (*mmap_capabilities)(struct file *);
#endif
	ssize_t (*copy_file_range)(struct file *, loff_t, struct file *,
			loff_t, size_t, unsigned int);
	int (*clone_file_range)(struct file *, loff_t, struct file *, loff_t,
			u64);
	ssize_t (*dedupe_file_range)(struct file *, u64, u64, struct file *,
			u64);
} __randomize_layout;
2
3
4
5
6
7
8
9
10
11
12
13
14
15
16
17
18
19
20
21
22
23
24
25
26
27
28
29
30
31
32
33
34
35
36
37
38
39
内部主要是一些函数指针,我们主要关注常用的几个函数:
ssize_t (*read) (struct file *, char __user *, size_t, loff_t *);
ssize_t (*write) (struct file *, const char __user *, size_t, loff_t *);
int (*mmap) (struct file *, struct vm_area_struct *);
int (*open) (struct inode *, struct file *);
int (*flush) (struct file *, fl_owner_t id);
int (*release) (struct inode *, struct file *);
2
3
4
5
6
驱动程序会定义与应用层函数(open write read ioctl close 等)对应的驱动层函数,驱动程序在初始化时将这些函数对应的函数指针赋值给 file_operations,然后在驱动注册时传入 file_operations 结构体,完成应用层系统调用与驱动程序函数的调用:
至此,文件读写的大致流程就出来了:
- app 调用 open read 等系统调用函数
- 内核构建相应的 struct file,并添加进数组,返回 index 给 app
- 调用驱动程序 file_operations 指针提供的 open read 等函数,完成实际的硬件操作
# 4.4 Hello 驱动的编写
驱动就是一个模块,在模块的基础上添加驱动框架和硬件操作的部分就可以完成驱动程序的编写了。下面我们写一个 hello 驱动,这个驱动只是简单的在用户态和内核态之间拷贝数据,没有实际的硬件操作,仅用于流程的展示。编写驱动的步骤如下:
- 确定主设备号,也可以让内核分配 (设备号就是硬件的一个编号)
- 定义自己的 file_operations 结构体
- 实现对应的 drv_open/drv_read/drv_write 等函数,填入 file_operations 结构体
- 定义 init 函数,在 init 函数中调用 register_chrdev 注册函数
- 定义 exit 函数,在 exit 函数中调用 unregister_chrdev 卸载函数
- 其他完善:提供设备信息,自动创建设备节点:class_create, device_create
在 ~/Project 目录下创建如下的目录结构:
hello_drv
├── build_driver.sh
├── hello_drv.c
└── Makefile
2
3
4
其中 hello_drv.c:
#include <linux/module.h>
#include <linux/fs.h>
#include <linux/errno.h>
#include <linux/miscdevice.h>
#include <linux/kernel.h>
#include <linux/major.h>
#include <linux/mutex.h>
#include <linux/proc_fs.h>
#include <linux/seq_file.h>
#include <linux/stat.h>
#include <linux/init.h>
#include <linux/device.h>
#include <linux/tty.h>
#include <linux/kmod.h>
#include <linux/gfp.h>

/* 1. 确定主设备号                                                                 */
static int major = 0;
static char kernel_buf[1024];
static struct class *hello_class;


#define MIN(a, b) (a < b ? a : b)

/* 3. 实现对应的open/read/write等函数,填入file_operations结构体                   */
static ssize_t hello_drv_read (struct file *file, char __user *buf, size_t size, loff_t *offset)
{
	int err;
	printk("%s %s line %d\n", __FILE__, __FUNCTION__, __LINE__);
	err = copy_to_user(buf, kernel_buf, MIN(1024, size));
	return MIN(1024, size);
}

static ssize_t hello_drv_write (struct file *file, const char __user *buf, size_t size, loff_t *offset)
{
	int err;
	printk("%s %s line %d\n", __FILE__, __FUNCTION__, __LINE__);
	err = copy_from_user(kernel_buf, buf, MIN(1024, size));
	return MIN(1024, size);
}

static int hello_drv_open (struct inode *node, struct file *file)
{
	printk("%s %s line %d\n", __FILE__, __FUNCTION__, __LINE__);
	return 0;
}

static int hello_drv_close (struct inode *node, struct file *file)
{
	printk("%s %s line %d\n", __FILE__, __FUNCTION__, __LINE__);
	return 0;
}

/* 2. 定义自己的file_operations结构体                                              */
static struct file_operations hello_drv = {
	.owner	 = THIS_MODULE,
	.open    = hello_drv_open,
	.read    = hello_drv_read,
	.write   = hello_drv_write,
	.release = hello_drv_close,
};

/* 4. 把file_operations结构体告诉内核:注册驱动程序                                */
/* 5. 谁来注册驱动程序啊?得有一个入口函数:安装驱动程序时,就会去调用这个入口函数 */
static int __init hello_init(void)
{
	int err;

	printk("%s %s line %d\n", __FILE__, __FUNCTION__, __LINE__);
	major = register_chrdev(0, "hello", &hello_drv);  /* /dev/hello */

	//提供设备信息,自动创建设备节点。
	// /dev/hello
	hello_class = class_create(THIS_MODULE, "hello_class");
	err = PTR_ERR(hello_class);
	if (IS_ERR(hello_class)) {
		printk("%s %s line %d\n", __FILE__, __FUNCTION__, __LINE__);
		unregister_chrdev(major, "hello");
		return -1;
	}

	device_create(hello_class, NULL, MKDEV(major, 0), NULL, "hello"); /* /dev/hello */
	//到这里我们就可以通过 /dev/hello 文件来访问我们的驱动程序了。
	return 0;
}

/* 6. 有入口函数就应该有出口函数:卸载驱动程序时,就会去调用这个出口函数           */
static void __exit hello_exit(void)
{
	printk("%s %s line %d\n", __FILE__, __FUNCTION__, __LINE__);
	device_destroy(hello_class, MKDEV(major, 0));
	class_destroy(hello_class);
	unregister_chrdev(major, "hello");
}


/* 7. 其他完善:提供设备信息,自动创建设备节点                                     */

module_init(hello_init);
module_exit(hello_exit);

MODULE_LICENSE("GPL");
2
3
4
5
6
7
8
9
10
11
12
13
14
15
16
17
18
19
20
21
22
23
24
25
26
27
28
29
30
31
32
33
34
35
36
37
38
39
40
41
42
43
44
45
46
47
48
49
50
51
52
53
54
55
56
57
58
59
60
61
62
63
64
65
66
67
68
69
70
71
72
73
74
75
76
77
78
79
80
81
82
83
84
85
86
87
88
89
90
91
92
93
94
95
96
97
98
99
100
101
102
103
可以看出,除了定义 read write 等函数,其他都是一些模板代码。
我们可以使用模块章节介绍的方法将驱动编译进内核。也可以直接编写 makefile 在 Kernel 源码外部编译驱动模块,然后通过命令行加载和卸载驱动程序。这里介绍第二种方法:
创建 Makefile 文件:
# 指向你自己的 Kernel 路径
KERN_DIR = /home/zzh0838/kernel/goldfish

all:
	make -C $(KERN_DIR) M=`pwd` modules

clean:
	make -C $(KERN_DIR) M=`pwd` modules clean
	rm -rf modules.order
	rm -f hello_drv_test

obj-m	+= hello_drv.o
2
3
4
5
6
7
8
9
10
11
12
-C 选项的作用是指将当前工作目录转移到你所指定的位置。“M=”选项的作用是,当用户需要以某个内核为基础编译一个外部模块的话,需要在 make modules 命令中加入“M=dir”,程序会自动到你所指定的 dir 目录中查找模块源码,将其编译,生成 KO 文件。
编写编译驱动的脚本 build_driver.sh:
#!/bin/bash
export ARCH=x86_64
export SUBARCH=x86_64
export CROSS_COMPILE=x86_64-linux-android-
export PATH=~/aosp/prebuilts/gcc/linux-x86/x86/x86_64-linux-android-4.9/bin:$PATH
make
2
3
4
5
6
执行 ./build_driver.sh,编译出 hello_drv.ko,接下来启动模拟器,把 ko 文件上传到模拟器:
cd aosp目录
source build/envsetup.sh
lunch aosp_x86_64-eng
# 驱动要和内核配套
emulator -kernel ~/Project/Kernel/goldfish/arch/x86_64/boot/bzImage

cd hello_drv
# 使用 adb 上传 ko 文件
adb push hello_drv.ko /data/local/tmp
# 进入模拟器的 shell 环境
adb shell
cd /data/local/tmp
#加载模块,加载完成后,/dev 目录下就会有一个 hello 文件
insmod hello_drv.ko
ls /dev/hello -l
2
3
4
5
6
7
8
9
10
11
12
13
14
15
接着我们再写一个测试程序:
在 ~/Project 目录下创建如下的目录结构:
hello_drv_test/
├── build_hello_driver_test.sh
├── CMakeLists.txt
└── hello_drv_test.c
2
3
4
hello_drv_test.c
#include <sys/types.h>
#include <sys/stat.h>
#include <fcntl.h>
#include <unistd.h>
#include <stdio.h>
#include <string.h>

/*
 * ./hello_drv_test -w abc
 * ./hello_drv_test -r
 */
int main(int argc, char **argv)
{
	int fd;
	char buf[1024];
	int len;

	/* 1. 判断参数 */
	if (argc < 2)
	{
		printf("Usage: %s -w <string>\n", argv[0]);
		printf("       %s -r\n", argv[0]);
		return -1;
	}

	/* 2. 打开文件 */
	fd = open("/dev/hello", O_RDWR);
	if (fd == -1)
	{
		printf("can not open file /dev/hello\n");
		return -1;
	}

	/* 3. 写文件或读文件 */
	if ((0 == strcmp(argv[1], "-w")) && (argc == 3))
	{
		len = strlen(argv[2]) + 1;
		len = len < 1024 ? len : 1024;
		write(fd, argv[2], len);
	}
	else
	{
		len = read(fd, buf, 1024);
		buf[1023] = '\0';
		printf("APP read : %s\n", buf);
	}

	close(fd);

	return 0;
}
2
3
4
5
6
7
8
9
10
11
12
13
14
15
16
17
18
19
20
21
22
23
24
25
26
27
28
29
30
31
32
33
34
35
36
37
38
39
40
41
42
43
44
45
46
47
48
49
50
51
通过 cmake 的方式来编译测试程序:
编写 CMakeLists.txt:
cmake_minimum_required(VERSION 3.0)

project(hello_drv_test)

add_executable(${PROJECT_NAME} hello_drv_test.c)
2
3
4
5
编写编译脚本 build_driver_test.sh:
export ANDROID_NDK=你的ndk安装目录

rm -r build
mkdir build && cd build

# CMake的内置支持
# cmake -DCMAKE_SYSTEM_NAME=Android \
# 	-DCMAKE_SYSTEM_VERSION=29 \
# 	-DCMAKE_ANDROID_ARCH_ABI=x86_64 \
# 	-DANDROID_NDK=$ANDROID_NDK \
# 	-DCMAKE_ANDROID_STL_TYPE=c++_shared \
# 	..

# 工具链文件支持
cmake \
    -DCMAKE_TOOLCHAIN_FILE=$ANDROID_NDK/build/cmake/android.toolchain.cmake \
    -DANDROID_ABI=x86_64 \
    -DANDROID_PLATFORM=android-29 \
	-DANDROID_STL=c++_shared \
	  ..

cmake --build .
2
3
4
5
6
7
8
9
10
11
12
13
14
15
16
17
18
19
20
21
22
编译程序并上传模拟器:
# 编译
sh ./build_driver_test.sh
# 打开模拟器,流程略
# 上传可执行文件
adb push build/hello_drv_test /data/local/tmp
# 进入到模拟器 shell
adb shell
# 执行程序
cd /data/local/tmp
# 加载驱动程序
insmod hello_drv.ko
./hello_drv_test -w "nihao"
./hello_drv_test -r
2
3
4
5
6
7
8
9
10
11
12
13
执行程序的结果如下所示:
.png)
# 5. Linux 内核常用数据结构
Binder 是一个 Linux 驱动,驱动代码会涉及很多 Linux 内核中的数据结构,接下来我们就来看看 Linux 中的常用数据结构的基本使用:
- 双向链表 list_head
- hash 表 hlist
- 红黑树 rbroot
# 5.1 双向链表
list_head 是内核中定义的双向链表:
// kernel/inclue/linux/types.h
struct list_head {
	struct list_head *next, *prev;
};
2
3
4
内核中提供了链表初始化的宏:
//初始化链表的宏
//初始化一个 list_head 节点, 其 next prev 指针均指向自己
#define LIST_HEAD_INIT(name) { &(name), &(name) }
#define LIST_HEAD(name) \
	struct list_head name = LIST_HEAD_INIT(name)

//也提供了初始化链表的函数:
```c
//初始化一个 list_head 节点
static inline void INIT_LIST_HEAD(struct list_head *list)
{
	WRITE_ONCE(list->next, list); //多线优化的赋值
	list->prev = list;
}
2
3
4
5
6
7
8
9
10
11
12
13
14
常用 LIST_HEAD 初始化一个链表:
LIST_HEAD(head);
//宏展开
struct list_head head = { &(head), &(head) };
2
3
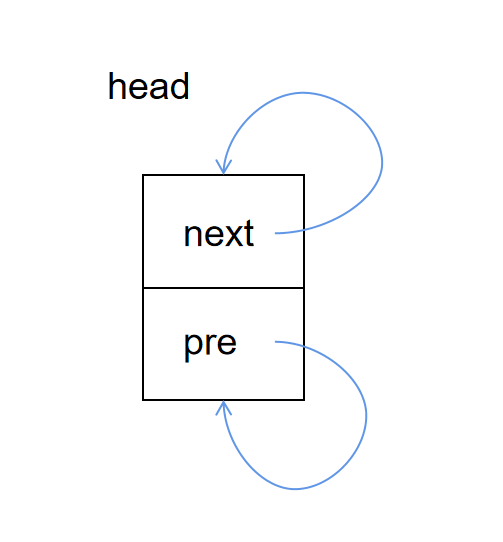
head 的 prev 和 next 指针都是指向自己:
但是如果只是利用 list_head 这样的结构体实现链表就没有什么实际意义了,因为正常的链表都是为了遍历结构体中的其它有意义的字段而创建的,而我们 list_head 中只有 prev 和 next 指针,却没有实际有意义的字段数据,所以毫无意义。我们可以创建一个宿主结构,然后在此结构中再嵌套 list_head 字段,宿主结构又有其它的字段(进程描述符 task_struct,页面管理的page结构等就是采用这种方法创建链表的)。接着看我们的示例:
struct list_node_task {
    int val;
    struct list_head list; //嵌套链表节点
};
2
3
4
接着我们可以创建节点:
struct list_node_task first_task =
{
	.val = 1,
	.list = LIST_HEAD_INIT(first_task.list)
};
2
3
4
5
可以通过 list_add 方法在链表头插入新的数据:
//定义并初始化链表头
LIST_HEAD(header);
//链表插入节点,加入链表头
list_add(&first_task.list, &header);
2
3
4
我们看一下, list_add 的具体实现:
/**
 * list_add - add a new entry
 * @new: new entry to be added
 * @head: list head to add it after
 *
 * Insert a new entry after the specified head.
 * This is good for implementing stacks.
 */
static inline void list_add(struct list_head *new, struct list_head *head)
{
	__list_add(new, head, head->next);
}

/*
 * Insert a new entry between two known consecutive entries.
 *
 * This is only for internal list manipulation where we know
 * the prev/next entries already!
 */
static inline void __list_add(struct list_head *new,
			      struct list_head *prev,
			      struct list_head *next)
{
	if (!__list_add_valid(new, prev, next))
		return;

	next->prev = new;
	new->next = next;
	new->prev = prev;
	WRITE_ONCE(prev->next, new);
}
2
3
4
5
6
7
8
9
10
11
12
13
14
15
16
17
18
19
20
21
22
23
24
25
26
27
28
29
30
31
从源码可以看出,list_add 就是在 head 链表头后和链表头后第一个节点之间插入一个新节点。然后这个新的节点就变成了链表头后的第一个节点了。
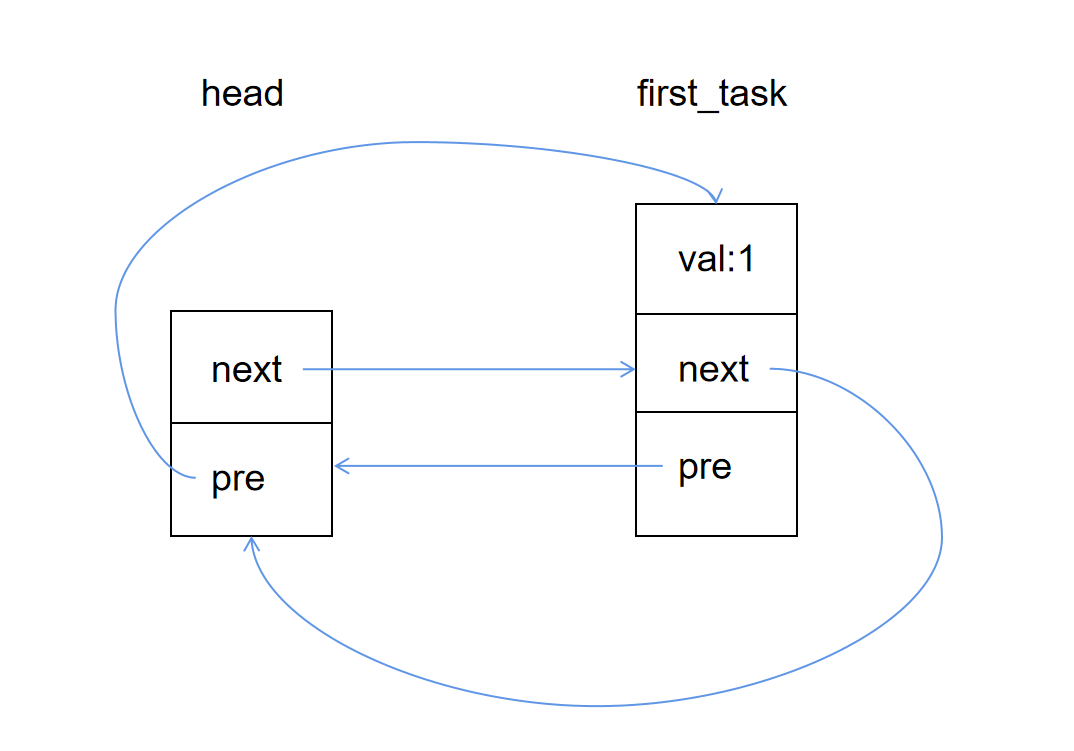
调用 list_add(&first_task.list, &header) 后,整体数据结构如下:
接着我们可以再构建一个节点,并插入链表:
struct list_node_task second_task =
{
	.val = 2,
	.list = LIST_HEAD_INIT(second_task.list)
};

list_add(&second_task.list, &header);
2
3
4
5
6
7
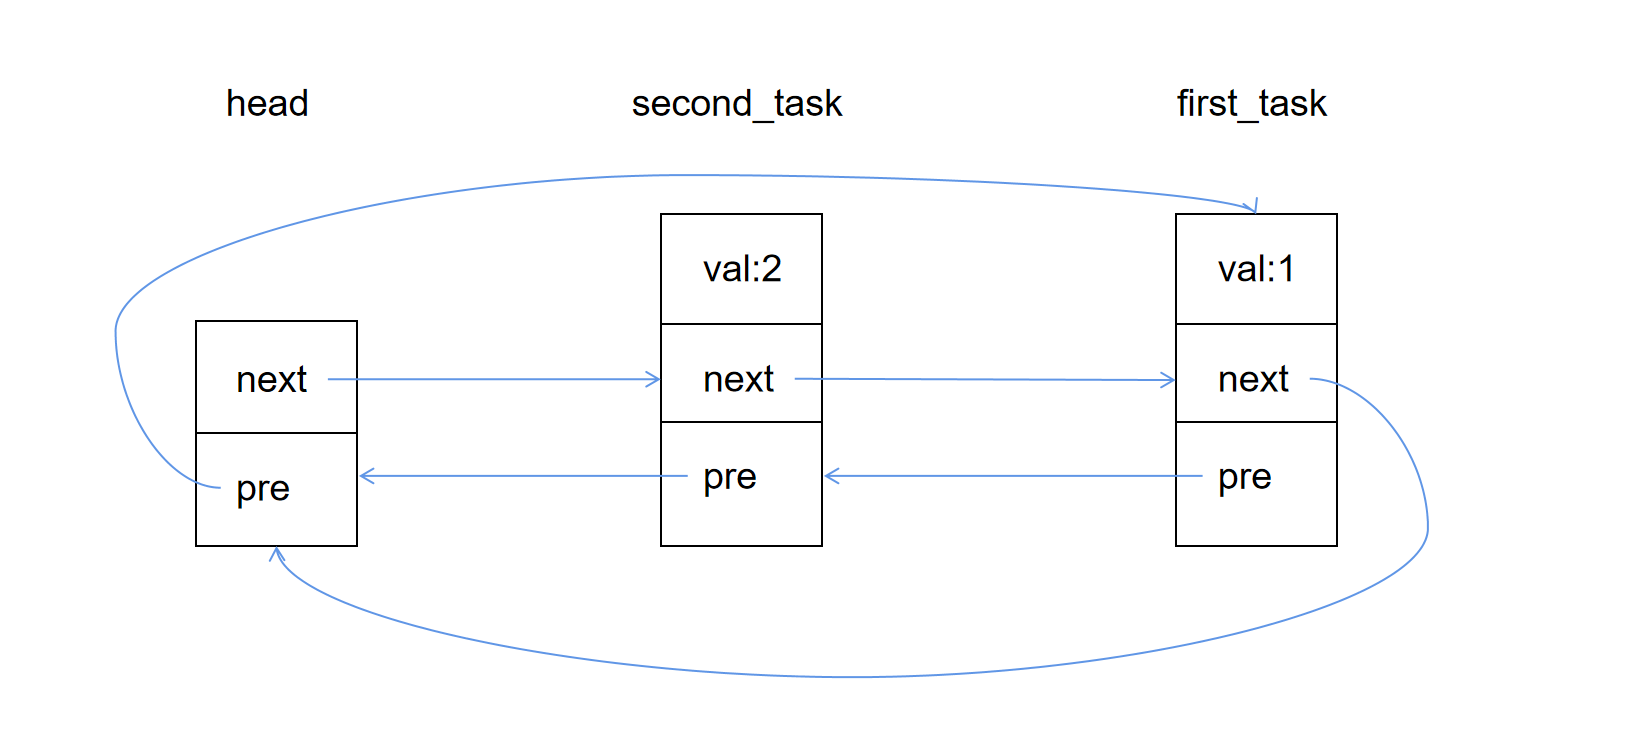
完成上述操作后,链表的整体结构如下:
可以看出 list_add 是在链表的头部添加节点,也可以通过 list_add_tail 方法在链表尾插入新的数据:
struct list_node_task third_task =
{
	.val = 3,
	.list = LIST_HEAD_INIT(third_task.list)
};
list_add_tail(&third_task.list, &header);
2
3
4
5
6
删除节点也是链表的一个常用操作:
//删除节点
list_del(&first_task.list);
2
list_del(struct list_head *entry) 接口可以删除链表中的任意节点,但需注意,前提条件是这个节点是已知的,既在链表中真实存在,prev,next 指针都不为 NULL。
链表的另一个重要操作是遍历:
//list_head 遍历
struct list_head *pos;
list_for_each(pos, &header) {

}

//倒序遍历
list_for_each_prev(pos, &header) {

}

//宿主结构的遍历
struct list_node_task *task;
list_for_each_entry(task, &header, list) {

}
2
3
4
5
6
7
8
9
10
11
12
13
14
15
16
上面的所有操作基本都是基于 list_head 这个链表进行的,涉及的结构体也都是:
struct list_head {
	struct list_head *next, *prev;
};
2
3
实际我们真正更关心的是包含 list_head 这个结构体字段的宿主结构体,因为只有定位到了宿主结构体的起始地址,我们才能对宿主结构体中的其它有意义的字段进行操作。
struct list_node_task {
    int val;
    struct list_head list;
};
2
3
4
那我们如何根据 list 这个字段的地址而找到宿主结构 my_node_task 的位置呢?
内核中提供了 list_entry 来实现这个功能:
// 获得 second_task
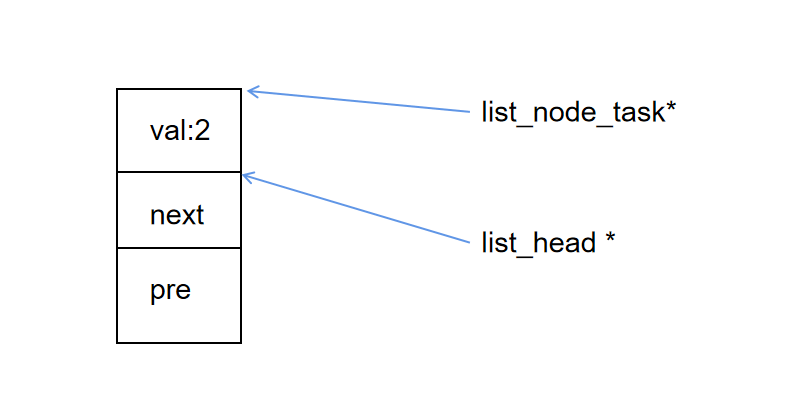
list_node_task *temp = list_entry(&second_task.list, struct list_node_task, list);
2
list_entry 通过 container_of 实现:
#define list_entry(ptr, type, member) \
	container_of(ptr, type, member)
2
container_of 在内核中有大量的使用,其内部实现主要是一些指针操作,有兴趣的同学可以自行查看一下源码。
# 5.2 hash 表
hlist 是 linux 内核中基于双向链表实现的 hash 表,相关的数据结构有两个:
//hash 桶的头结点
struct hlist_head {
	struct hlist_node *first;//指向每一个hash桶的第一个结点的指针
};

//hash 桶的普通结点
struct hlist_node {
	struct hlist_node *next;//指向下一个结点的指针
	struct hlist_node **pprev;//指向上一个结点的next指针的地址
};
2
3
4
5
6
7
8
9
10
hash 表的结构如下:
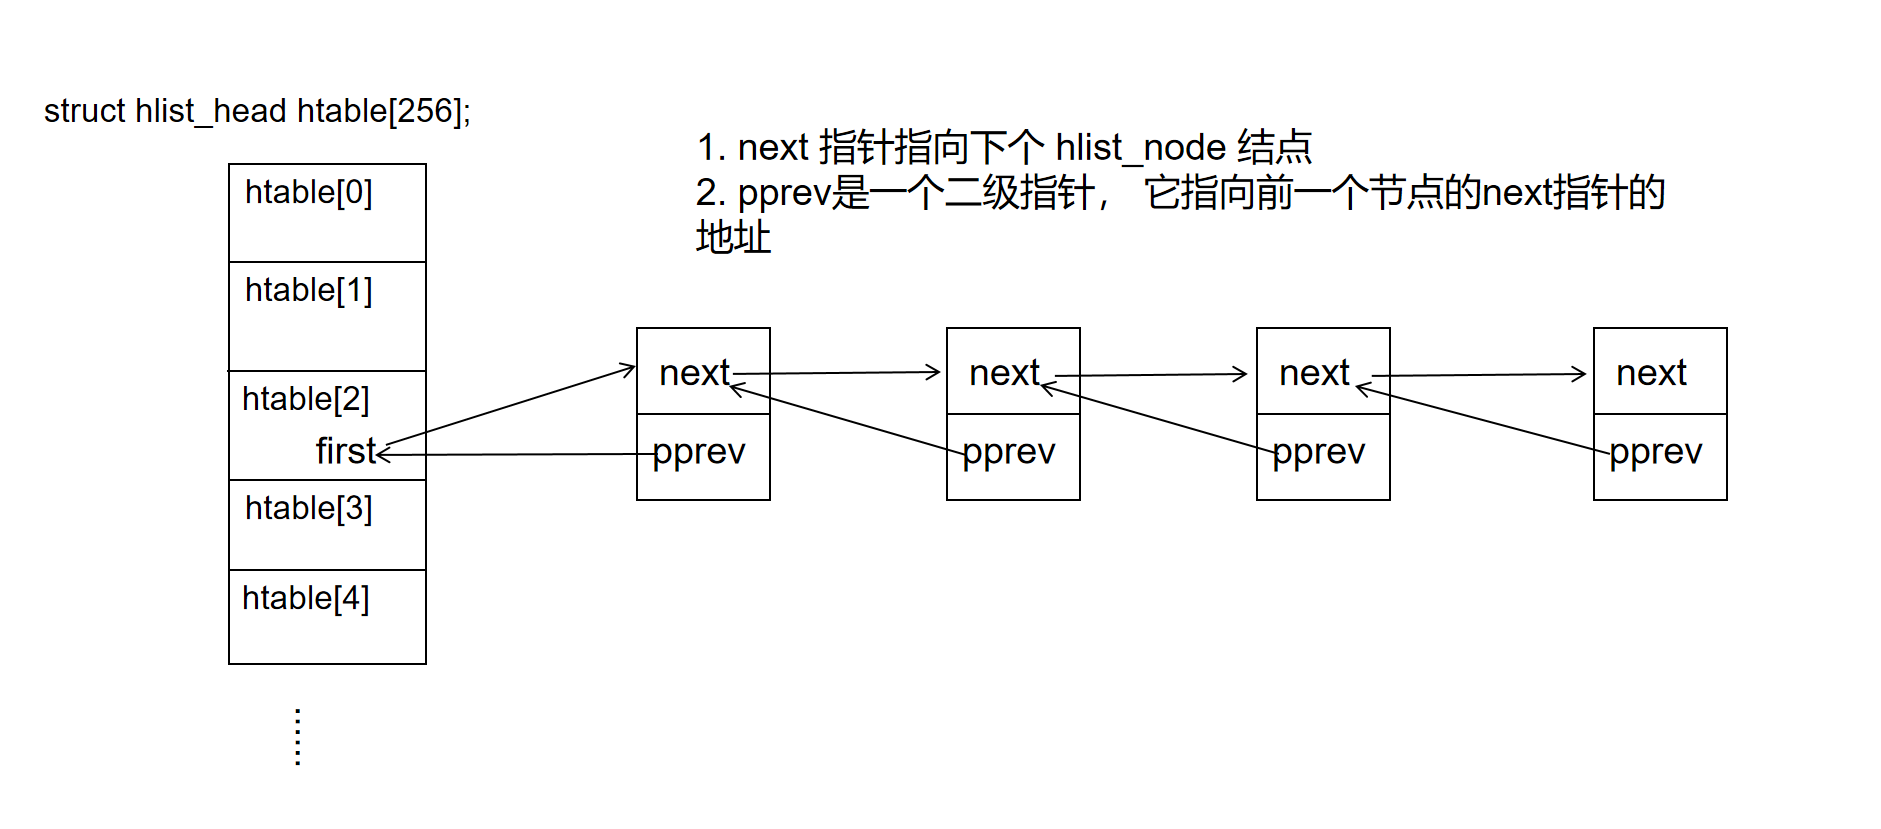
- 使用 hlist 通常会定义一个 hlist_head 的数组,
- hlist_head 结构体只有一个成员,即 first。 first 指针指向该 hlist 链表的第一个节点。
- hlist_node 结构体有两个成员,next 和 pprev。 next 指针很容易理解,它指向下个 hlist_node 结点,倘若该节点是链表的最后一个节点,next 指向 NULL。
- pprev 是一个二级指针,它指向前一个节点的 next 指针的地址
pprev 为什么要是一个执行向前一个节点的 next 指针地址的二级指针? 直接指向上一个节点会不会更简单一点?
这里应该是一个设计取向问题,因为 hash 桶的类型是 hlist_head,为了减少数据结构额外内存开销,其内部有一个只有一个指针,如果 hlist_node 采用传统的 next,prev指针,对于第一个节点和后面其他节点的处理会不一致。这样并不优雅。
hlist_node 巧妙地将 pprev 指向上一个节点的 next 指针的地址,由于 hlist_head 的 first 域指向的结点类型和 hlist_node 指向的下一个结点的结点类型相同,这样就解决了通用性!
这种编码的方式是值得我们学习的。
接着我们来看一下,如何初始化一个 hash 表并插入数据:
 //定义宿主结构体
struct hdata_node {
    int data;
    struct hlist_node list;
};

//hash 数组
struct hlist_head htable[256];

struct hdata_node *hnode;

//初始化
for (int i = 0; i < 256; ++i) {
    hnode = kmalloc(sizeof(struct hdata_node), GFP_KERNEL);
    INIT_HLIST_NODE(&(hnode->list));
    hnode->data = i * 9;
    //链表中插入数据
    //自定义 hash 算法,这里简单取余
    int key = hnode->data % 256;
    //添加到链表首部
    hlist_add_head(&hnode->list, &htable[key]);
}
2
3
4
5
6
7
8
9
10
11
12
13
14
15
16
17
18
19
20
21
22
查询数据:
//查询
int search = 67 * 9;
//自定义 hash 算法,这里简单取余
int key = search % 256;

if (hlist_empty(&htable[key])) {
    //没有需要查询的项
} else {
    //遍历查询
    hlist_for_each_entry(hnode, &htable[key], list) {
        if (hnode->data == search) {
            //找到了
            break;
        }
    }
}
2
3
4
5
6
7
8
9
10
11
12
13
14
15
16
删除数据:
//删除
int delete = 88 * 9;
int key2 = search % 256;
struct hlist_node *n;

if (hlist_empty(&htable[key])) {
    //没有需要查询的项
} else {
    //遍历查询
    hlist_for_each_entry_safe(hnode, n ,&htable[key], list) {
        if (hnode->data == search) {
            //找到了
            hlist_del(hnode);
            break;
        }
    }
}
2
3
4
5
6
7
8
9
10
11
12
13
14
15
16
17
内存清理:
//退出程序前释放资源
for(i=0; i < 256; i++){
    //遍历每一个槽,有结点就删除
    hlist_for_each_entry_safe(hnode, n, &htable[i], list){
        hlist_del(&hnode->list);
        kfree(hnode);
        hnode = NULL;
    }
}
2
3
4
5
6
7
8
9
# 5.3 红黑树
红黑树,从理论到实现都是相对复杂的数据结构,但是实际编码中一般不需要我们去做实现,把它看成一个插入数据慢点,查找数据快点,排序非常快的链表即可。从使用上来说,红黑树主要又以下特点:
- 插入、删除、查找的时间复杂度接近 O(logN),N 是节点个数;是一种性能非常稳定的二叉树!
- 中序遍历的结果是从小到大排好序的
接着我们来看下 linux 内核中,红黑树的基本使用:
内核中定义了以下几个红黑树相关的数据结构:
//红黑树节点
struct rb_node {
	unsigned long  __rb_parent_color;
	struct rb_node *rb_right;
	struct rb_node *rb_left;
} __attribute__((aligned(sizeof(long))));

//红黑树根节点
struct rb_root {
	struct rb_node *rb_node;
};
2
3
4
5
6
7
8
9
10
11
12
接下来我们看看如何如何使用内核中的红黑树:
//定义宿主结构体
struct my_tree_node {
    int data;
    struct rb_node node;
};

//内核中没有提供现成的插入,查找函数,需要使用者自己实现
int rb_insert(struct rb_root *root, struct my_tree_node *insert_node) {
    struct rb_node *n = root->rb_node;
    struct rb_node *parent = NULL;
    while (n) {
        //获得宿主结构
        struct my_tree_node *thiz = container_of(n, struct my_tree_node, node);
        parent = n;
        if (thiz->data > insert_node->data) {
            n = n->rb_left;
        } else if (thiz->data < insert_node->data) {
            n = n->rb_right;
        } else {
            //已经有了待插入节点,直接退出
            return -1;
        }
    }

    //插入新的节点
    rb_link_node(&insert_node->node, parent, &n);
    rb_insert_color(&insert_node->node, root);
}

//定义节点查询函数
struct my_tree_node *rb_search(struct rb_root *root, int new) {
    struct rb_node *node = root->rb_node;
    while (node) {
        struct my_tree_node *my_node = container_of(node, struct my_tree_node, node);

        if (my_node->data > new) {
            node = node->rb_left;
        } else if (my_node->data < new) {
            node = node->rb_right;
        } else {
            return my_node;
        }
    }

    return NULL;
}

struct my_tree_node *data;
struct rb_node *node;

struct rb_root mytree = RB_ROOT;

//插入元素
for (int j = 0; j < 10; ++j) {
    data = kmalloc(sizeof(struct my_tree_node), GFP_KERNEL);
    data->data = i * 36;
    rb_insert(&mytree, data);
}

//遍历红黑树
for(node = rb_first(&mytree); node; node = rb_next(node)) {
    printk("key=%d\n", rb_entry(node, struct my_tree_node, node)->data);
}

//红黑树内存清理
for(node = rb_first(&mytree); node; node = rb_next(node)) {
    data = rb_entry(node, struct my_tree_node, node);
    if (data) {
        rb_erase(&data->node, &mytree);
        kfree(data);
    }
}
2
3
4
5
6
7
8
9
10
11
12
13
14
15
16
17
18
19
20
21
22
23
24
25
26
27
28
29
30
31
32
33
34
35
36
37
38
39
40
41
42
43
44
45
46
47
48
49
50
51
52
53
54
55
56
57
58
59
60
61
62
63
64
65
66
67
68
69
70
71
72
# 6. 虚拟内存与 Linux 文件访问接口
# 6.1 什么是虚拟内存
一些简单的计算机系统,比如简单的单片机,cpu 是直接访问物理内存的,不存在虚拟内存,同时也不存在操作系统,我们的程序直接跑在硬件之上。
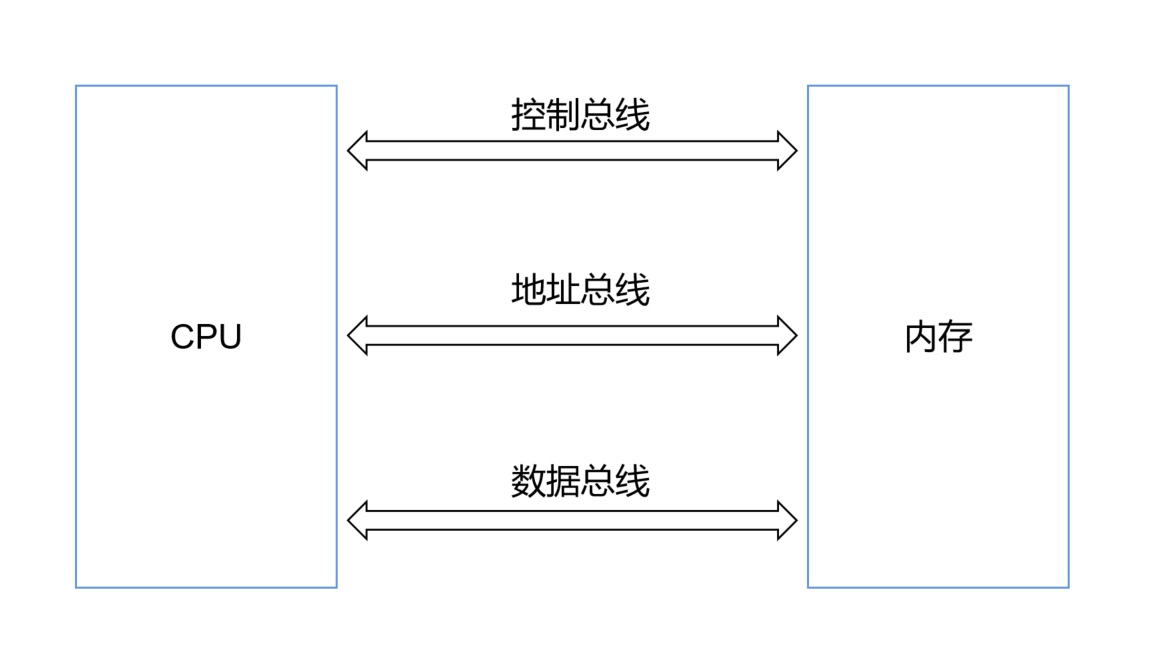
读内存的过程如下:
- cpu 通过控制总线向内存发送读指令
- 随后将内存地址通过地址总线发送给内存
- 内存读到数据后,通过数据总线将数据发送给 cpu
物理内存的地址从 0 开始,我们编写的代码读写内存也是从 0 开始。
单片机上只跑一个程序的时候,一切安好。
如果我们要再跑一个程序,我们读写内存如果还是从 0 开始,就会和第一个程序“打架”,发生冲突。如果不从 0 开始,比如我们规定第一个程序使用 0 到 4k的内存,第二个程序使用 4k 到 8k 的内存 ,这样能解决问题,但是,我们的程序就只能在特定环境下使用。
那怎么办,加一层————虚拟内存。
我们的每个进程访问的是从 0 开始的虚拟内存,在通过 mmu (内存管理单元)映射到物理内存,mmu 可以理解为一张巨大的表格,里面记录着每个进程使用的虚拟内存地址与物理内存地址的映射关系:

有了虚拟内存以后,内存的读过程如下:
- 进程1 发出读内存信号
- 进程1 向 MMU 发送一个虚拟地址
- MMU 在自己的表格中找到对应的物理地址,并从物理内存上读出数据,将数据返回给进程 1
对于虚拟地址空间一般分为:
- 内核地址空间:操作系统内核使用的虚拟内存区域
- 用户地址空间:用户态程序使用的虚拟内存区域区域
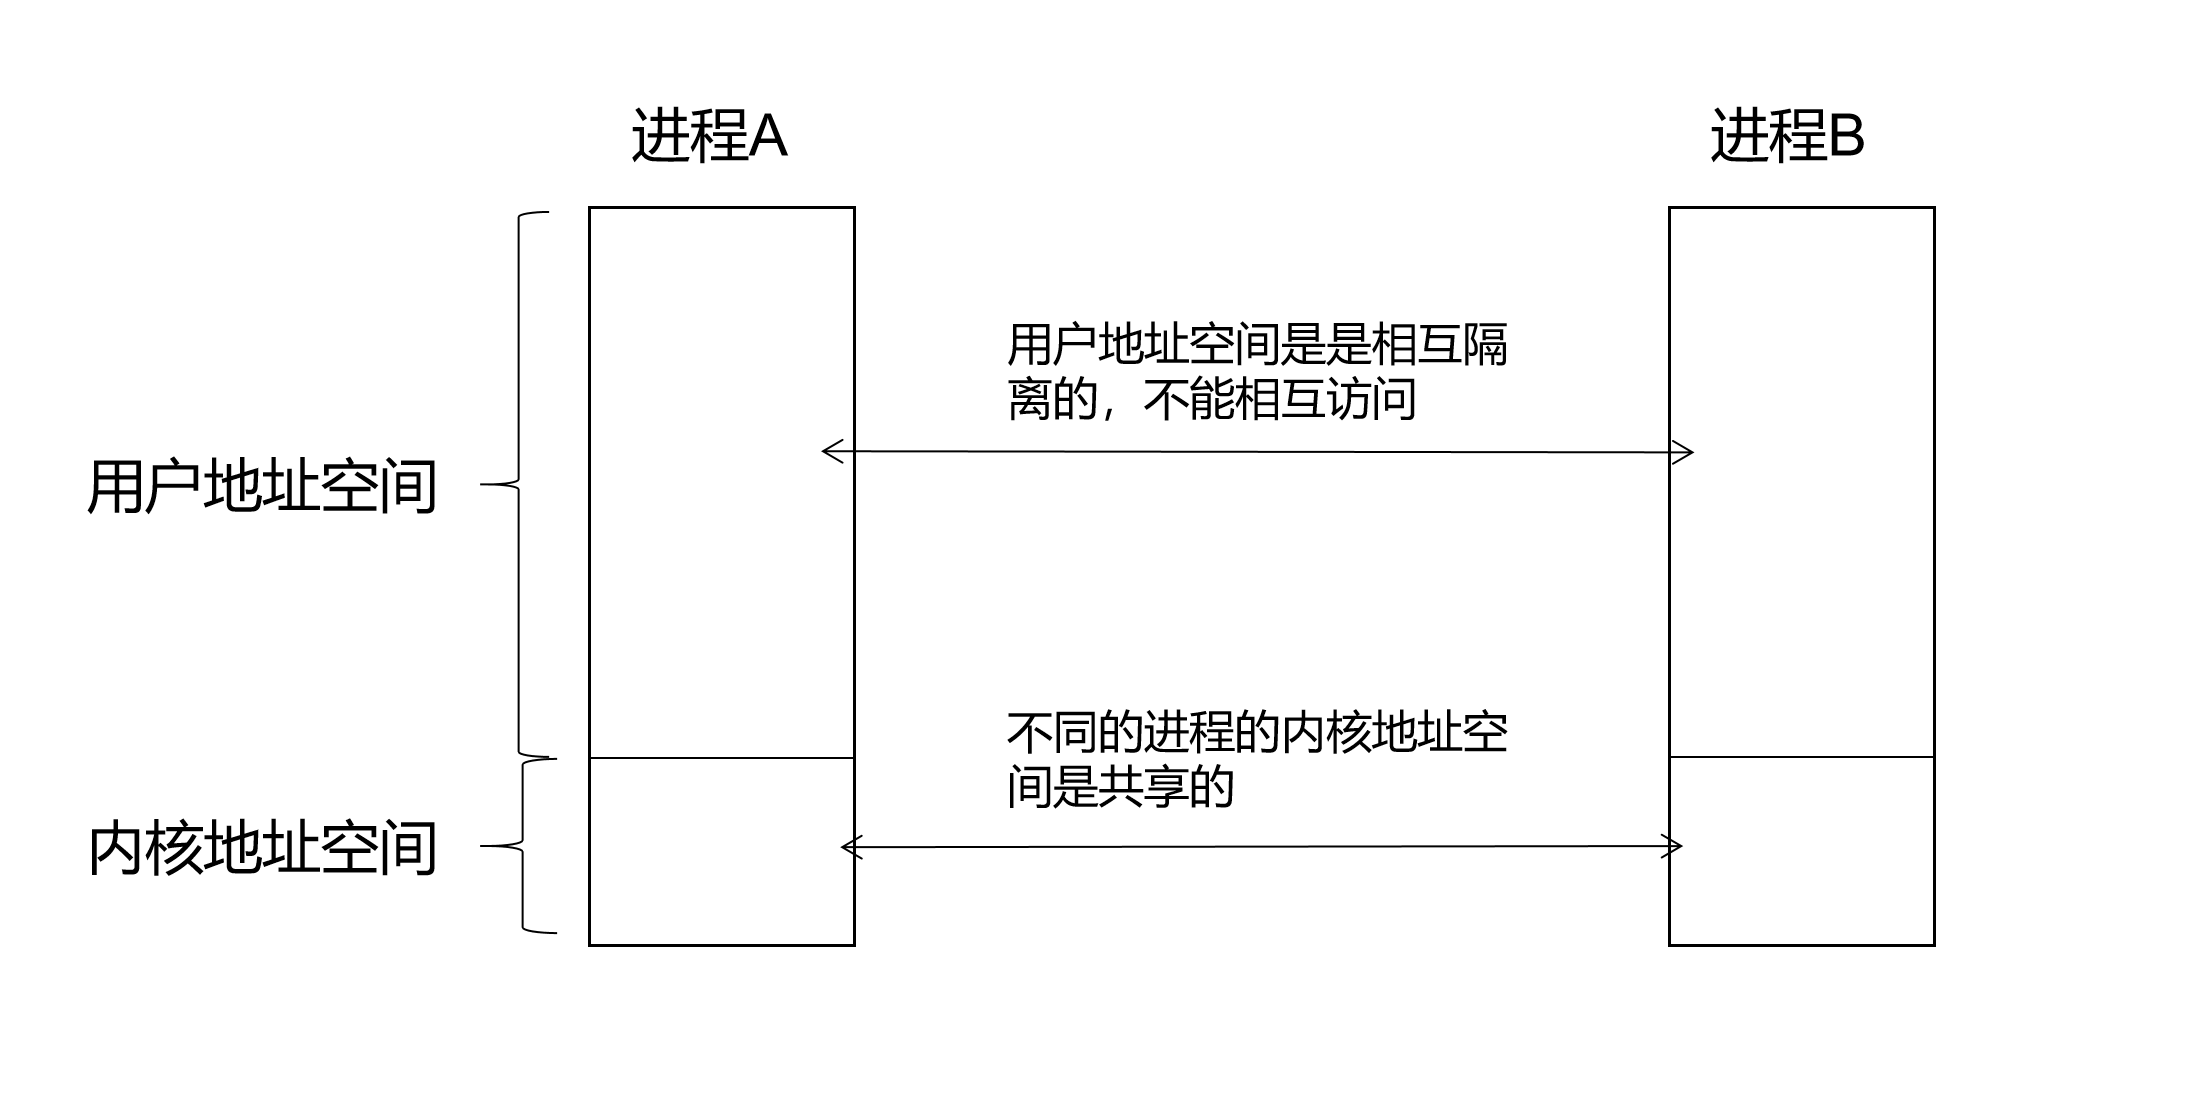
不同进程之间的内核地址空间映射到相同的物理地址,即不同的进程的内核地址空间是共享的。不同进程之间的用户地址空间映射到不同的物理地址,相互之间是隔离的,无法访问的。
以上是虚拟内存的一个形象理解,对于软件开发人员已经足够,实际情况要复杂很多,涉及了分段分页,一二级页表,快表等内容,更为详细的内容可以参考计算机组成,操作系统相关的书籍
# 6.2 Linux 文件访问系统调用
在 Linux 中一切皆文件,比如 Android 中的 binder 实际是一个字符驱动,其对应的文件是 /dev/binder。所以我们需要熟悉 Linux 中文件访问系统的接口。
访问文件常用的函数有下面几个:
open
close
read
write
ioctl
mmap
2
3
4
5
6
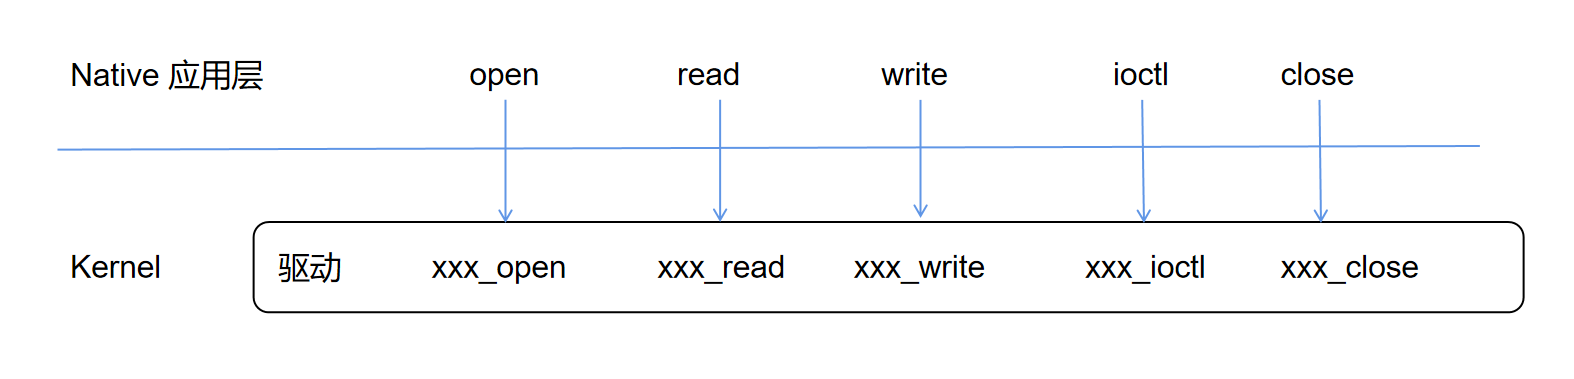
这些函数都是系统调用接口,由内核中的 VFS( Virtual Filesystem)提供,VFS 对上(应用层)提供统一的文件访问接口,对下(文件系统,设备文件)根据不同目标特点,实现具体的操作,比如打开,读写等:
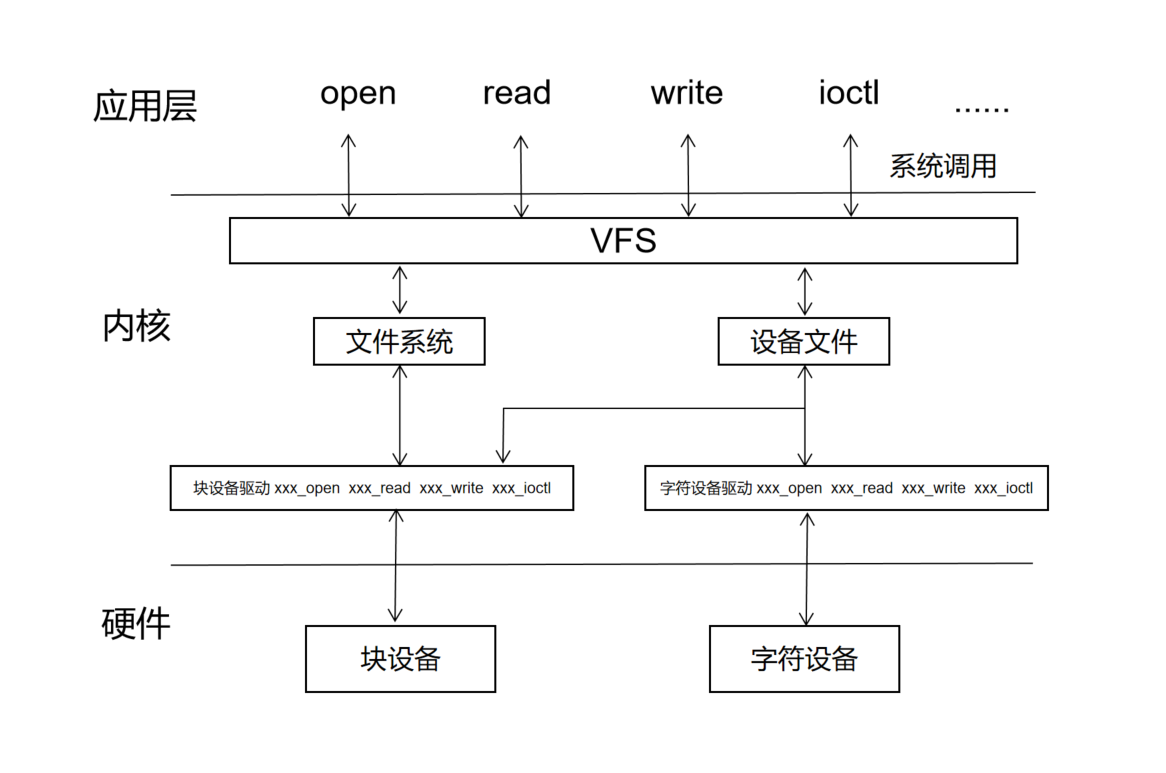
实际上,我们应用层调用的 open read 等系统调用,通过内核部分的处理最终都是调用到驱动中实现的 xxx_open xxx_read 等函数。
# 关于
我叫阿豪,2015 年本科毕业于国防科学技术大学指挥信息系统专业,毕业后从事信息化装备的研发工作,主要研究方向是 Android Framework 与 Linux Kernel。
如果你对 Android Framework 感兴趣或者正在学习 Android Framework,可以关注我的微信公众号和抖音,我会持续分享我的学习经验,帮助正在学习的你少走一些弯路。学习过程中如果你有疑问或者你的经验想要分享给大家可以添加我的微信,我拉你进技术交流群。
